
-
Freestanding Tents vs. Non-Freestanding Tents
Virtually all tents can be divided into two categories: freestanding and non-freestanding.
- Freestanding tents don't require ropes, guy lines or stakes for structural support and will stand on their own using just the poles. Dome tents are the most common example of the freestanding design.
- Non-freestanding tents do require the use of ropes, guy lines or stakes for support. After the canopy and poles are erected, ropes or guy lines are staked into the ground and tightened to maintain the structure of the tent. Most A-frame and outfitter tents are non-freestanding.
Three-Season, Four-Season and Convertible Tents
- Three-season tents are designed to be used during spring, summer and fall. These tents are the most popular and widely available style. Three-season tents are lightweight and built to hold up against windy and rainy conditions. Although they’re not designed to handle a significant amount of snow, most can manage a few inches without a problem.
- Four-season tents are designed to withstand year-round conditions. This type of tent typically has additional poles that strengthen the tent walls, making them more resilient to strong winds, torrential rains and heavy snow. Four-season canopies have less mesh, allowing them to retain more warmth. Most are built using a dome design, which prevents snow from accumulating and reduces the chances of a collapse. Because they’re built sturdier, this type of tent will typically be heavier than a comparably sized three-season tent.
- Convertible tents are essentially hybrids that can be converted from four-season to three-season mode by omitting additional poles and panels. Although they’re slightly less robust than true four-season tents, convertible tents are still a great option for people who enjoy camping year round.
Double-Wall Tents vs. Single-Wall Tents
- Double-wall tents combine a canopy and a separate waterproof rainfly. The ventilated canopy allows moisture vapor to escape, preventing excess condensation from forming inside the tent. The external fly blocks wind, rain and snow. There is usually a gap between the canopy and fly, which allows fresh air to circulate. Most three-season dome tents are made using a double-wall design.
- Single-wall tents are constructed using a single layer of waterproof breathable material, rather than combining a vented canopy and separate rain fly. Single-wall dome tents are lighter and more compact than double-wall dome tents. For this reason, single-wall tents are primarily used for setting up alpine base camps, when minimizing weight and bulk is extremely important. However, moisture and heat may cause more condensation buildup in a single-wall tent.
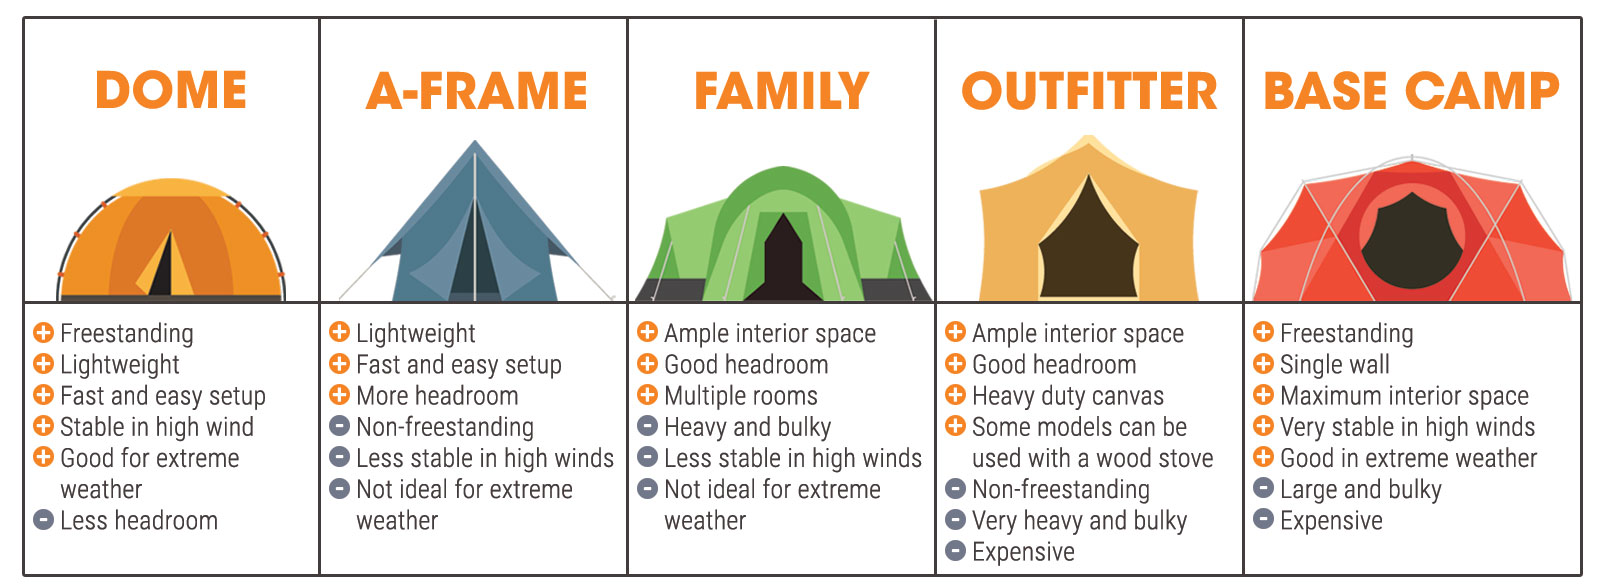
Types of Tents and Shelters
Dome Tents
This modern, free-standing tent design uses flexible, segmented poles to maintain structural integrity. Dome tents are characterized by their rounded, dome-shaped canopy, which enables them to withstand heavier winds. Dome tents also offer more interior space than a comparably sized A-frame tent (but usually less headroom).
A-Frame Tents
The classic A-frame style tent has been around for hundreds of years. A-frame tents are typically fast and easy to set up. However, the shape is more prone to buckling in high winds, which is why the dome tent has become a much more popular alternative.
Family Tents
These tents are designed to accommodate larger groups of people (usually four or more). Most are non-freestanding. Some family tents have a central living area with two side rooms that are separated from the main room. Large, family-sized tents are generally intended for car camping only, since they can be quite heavy and bulky. These tents are generally not a good choice in high winds, snow or extreme weather.
Outfitter Tents (Wall Tents)
Large canvas tents that are designed for extended trips are called wall tents or outfitter tents. Unlike a dome tent, outfitter tents are not freestanding, and require a combination of large poles, stakes and rope to remain upright. Outfitter tents are heavy, bulky and take longer to setup. However, they offer ample interior space, and some canvas wall tents can even accommodate a portable wood stove.
Basecamp Tents
High-occupancy, single-wall dome tents are often called base camp tents. These freestanding tents are typically large enough to accommodate six or more people. Although they’re on the heavier side, most base camp tents are still lighter than family tents and outfitter tents. They’re also designed to offer excellent stability and weather protection in harsh, windy and snowy environments, such as alpine base camps.
Bivy Sack
A bivouac or bivy sack is essentially a waterproof breathable sleeve designed to slip over a sleeping bag and pad, providing extra protection from wind, rain and snow. Unlike a tent, most bivy sacks do not have a pole structure and don’t leave any additional room inside for gear. However, some models do include a single pole that arcs over the user’s face, providing a little additional head room.
Portable Shelter
Designed to provide limited protection from the elements, a lightweight shelter does not have walls and typically has a detached footprint or no floor at all. Minimalist shelters designed for the backcountry are essentially rain flies that can be setup with trekking poles, stakes and guy lines, similar to an A-frame. Some shelters can also be strung between two trees. Sun shelters are designed to provide shade, and are usually not intended for overnight camping.
-
When you’re reading the description of a tent online, it’s easy to get overwhelmed by all the features and specs. Here's a quick breakdown:
Tent Material
The type of fabric used in the construction of the canopy, floor and rainfly is detailed in the specs tab. Typically, the canopy is made of ripstop nylon, polyester or mesh. The floor and rainfly are usually made of nylon taffeta or polyester.
Doors
All tents have at least one door. Tents that accommodate multiple occupants may also have a second door at the rear. Having two doors can be a nice feature, allowing you to store gear just outside one door and use the other for entry and exit.
Guy Points and Guy Lines
External guy points are reinforced loops stitched to the outside of a tent’s wall or rainfly. These will allow you to attach guy lines, which are usually included. Adjustable guy lines are strong cords that help anchor the tent to the ground and keep the canopy or rainfly taut. Guy lines prevent sagging and make the tent better able to shed rain and snow. Guy lines also add stability during high winds.
Floor Area and Dimensions
Floor area is a measurement of the square footage within a tent's interior. Floor dimensions are measured in inches. The first dimension is length, followed by width. For example, a tent is listed as 100x70" is 100 inches from head to foot and 70 inches at its widest point.
Number of Poles
Generally, the more poles a tent has, the more stability it will provide. However, depending on the shape, some dome tents are quite stable with only two poles. Four-season tents and mountaineering tents designed to withstand extreme weather typically have more poles than three-season tents.
Packed Size
Measured in inches, this is the size of your folded and rolled tent when it's stored inside the stuff sack. A measurement of 10x24" means that the tent's packed size is 10" in diameter and is 24" long.
Tent Weight
This measurement refers to the total weight of the entire tent, including canopy, fly, poles, guy lines, stakes (if included) and storage bags.
Peak Height
This is a measurement of how much head room you’ll have in the center of your tent. Most dome tents designed for two to four people have a peak height between 42 and 48 inches. Some family and basecamp tents may be tall enough to stand up in.
Tent Capacity
Capacity determines how many people can “comfortably” sleep inside a tent. Be aware that most tent manufacturers leave very little additional gear space inside a tent at full capacity. If you plan on leaving any gear inside your tent, you may prefer the next size up. A three-person tent will accommodate two people comfortably with extra space for gear. Of course, that three-person tent will also weigh slightly more than a two-person tent of the same model. If the tent you are considering has a vestibule for additional gear storage, you may not need the extra room inside.
Vestibule
A vestibule is a covered area outside the main body of a tent that can be used for storage. In a double-wall tent, the vestibule is usually part of the rain fly, and therefore may not have a floor. However, it’s still a very handy space to keep backpacks and other items without taking up room inside the tent. Some tents even have two vestibules. Vestibule area is measured in square feet.
-

After learning about the different types of tents and features, don’t worry if you’re still not sure what to get. In this section, we’ll cover all of the questions you should ask yourself to help you choose something that will meet your needs.
Time of Year
- Do you camp during the winter? If so, you’ll want a four-season tent.
- If you plan to haul your tent out at the first signs of spring and not put it away until late fall, you may still benefit from owning a four-season or convertible tent. This way, you'll be prepared for any late-season weather.
- If you spend the majority of your time camping between May and September, a three-season tent is the way to go.
Number of Occupants
- Do you usually camp with a spouse or friend? A two-person tent is the minimum you’ll need. As we mentioned earlier, two people in a two-person tent won’t have much room for gear inside. Unless you’re interested in keeping weight to an absolute minimum, you might be happier in a three-person tent.
- Do you prefer to camp solo? You can always consider a one-person tent. However, if you prefer to store any gear inside or bring along a canine companion, a two-person tent will be better. If you’re a bare-bones backpacker looking for the absolute lightest option, get a waterproof bivy sack or backcountry shelter.
- Looking to go camping with the family and prefer to have everyone under one roof? A spacious family camping tent is great for car camping. If you plan on backpacking to your camping location, consider a lighter, high-occupancy dome tent.
- The higher the occupant capacity, the heavier your tent will be. If you’re backpacking with a group and all staying in one tent, divide the canopy, fly and poles up among your group to spread out the load.
Destination
- Do you prefer to toss everything in the car and drive to your favorite campsite? Weight and size aren’t as much of an issue when you’re car camping. You may as well enjoy a little extra space and go with a slightly larger tent.
- If you’re planning on backpacking to a more remote destination, go with the lightest option or one size up from the absolute minimum number of occupants.
Tent Footprint
- A tent footprint is a custom ground cloth designed to match the contours of your tent floor. A tent footprint helps protect the underside from abrasion, small rocks and sticks. Without a footprint or small tarp underneath your tent, the fabric on the bottom can wear out more quickly and is more prone to damage.
- Most tent footprints have loops or hooks that attach to the tent stakes. Footprints are typically sold separately and not included with your tent. If you can't find a footprint for your specific tent model, a laminated tarp or even a plastic tablecloth can be used instead.
Pole Sleeves or Clips?
Tent poles usually connect to a tent in one of two ways: clips or sleeves. Each has pros and cons.
- Sleeves are considered the most stable option, since clips can potentially unhook themselves or wear out over time.
- However, clips are easier to use and make setup time faster. Clips also usually provide a bigger gap between the rainfly and the body of the tent, which minimizes condensation on the canopy.
- Some tents have "continuous" pole sleeves, which means you don't have to thread your poles through multiple sections of smaller sleeves. Continuous sleeves make setup easier than segmented sleeves.
Other Handy Extras
- Factory-taped seams have a clear, waterproof tape bonded to the seams. Taped seams are much more water-resistant, but not necessarily fully waterproof. Factory-taped seams can still be hand-sealed to ensure the best protection (see the Tent Tips section for more details).
- Bathtub floor, or just “tub floor,” is a type of floor construction that extends several inches up the sides of the tent before connecting with the tent walls. The seams of a tub floor are usually taped or sealed to prevent leaks. Because most of the tent’s seams are elevated off the ground, a bathtub floor offers better protection in heavy rain.
- Shock-cord poles are multi-section tent poles that are held together by a thin, elastic bungee cord. This keeps pole sections together and makes assembling them much easier. Most modern tents have this type of pole.
- Color-coded poles and clips make it easier to match a tent pole with the corresponding clips for proper alignment.
- Gear loft is a hammock-like accessory that attaches to the interior roof of a tent. The loft keeps clothing and other lightweight items out of the way without taking up more room in the tent.
- Jingle-free zippers are zippers with pull tabs that are made of fabric instead of metal. This prevents the double zippers from “jingling” against one another during a windy night.
- Reflective points are small reflectors that increase the visibility of your tent, making it easier to find in the dark with just a small flashlight or headlamp.
- Fast pitch setup, also called ultralight setup or bare bones setup, is a feature that allows you to pitch the rainfly, poles and footprint without the canopy, creating a minimalist backcountry shelter. This is intended to save weight during backpacking trips in milder weather. However, this type of setup is not ideal for very rainy, windy or buggy conditions.
-

After you buy a new tent, there are a few things you should know that can help your tent last longer and make your life easier in the great outdoors.
Sealing Your Tent Seams
When a tent is stitched together, the sewing process creates thousands of tiny needle holes along the seams. If these holes are left unsealed, water can seep through and create a puddle in your tent. Depending on the brand, some tents may be sealed or taped at the factory. Others may only have taped seams on the fly and floor. Some are not sealed or taped whatsoever.
Unpack your new tent, and take a look at the interior seams. If they’ve been sealed, you’ll notice a clear layer of dried adhesive over the stitches. If they’ve been taped, you’ll notice a clear tape bonded to the seams. Be aware that taped seams are not as waterproof as sealed seams. If your tent seams are taped, it’s still a good idea to use a urethane sealer on the exterior seams for extra protection. If your tent isn’t sealed or taped at all, you’ll definitely want to seal it yourself.
At this point, you're probably wondering why anyone would pay good money for a tent that isn’t sealed. Well, some manufactures consider sealing an extra step, and only essential for extreme weather. Sealing your tent’s seams can be a hassle, but if you ever find yourself tucked inside your tent during a downpour, you’ll be glad you took the extra steps. Some tent manufacturers provide a kit, which includes a tube of urethane sealant, an applicator and a small brush. If not, you can pick these up yourself online. Seam Grip by Gear Aid is a popular option. When you apply the sealer, be sure to overlap both sides of the seam by a few millimeters. Be thorough, and your sealant should last for several seasons.
Tip: To avoid globs of sealant on your new tent, pick up a precision syringe applicator with a curved plastic tip. These are available at most hobby stores in the model-building section, or online.
Using Tent Stakes
There two reasons why you should always stake down your tent: 1) Stakes will prevent your tent from blowing away in high winds and getting damaged. 2) Staking your tent and guy lines will prevent sagging, and a saggy tent is more likely to leak.
- Unless you’re backpacking, remember to bring a mallet or hammer to drive in your stakes. The ground is not always soft, and scrounging around for a large rock can be a hassle.
- Not all tents come with stakes, so be sure to check. Some tents come with thinner aluminum stakes designed for soft terrain. If the ground is hard or frozen, weaker stakes will bend and become useless. You might prevent a lot of hassle by investing in stronger stakes.
- Sometimes the ground is simply too hard to pound in any stakes. Instead, you can take your trekking poles or tree branches and thread them through the stake loops. Next, arrange heavy rocks over the poles or branches to weigh them down. You can also use sticks and large rocks to secure the guy lines.
Using Guy Lines
Properly securing your tent’s guy lines will eliminate sagging and make your tent more resistant to wind and weather. Tethering your rainfly with guy lines will keep it from laying against the canopy.
- Most rainflies include either two or four guy lines. Be careful not to stretch the rainfly or guy lines too tight, as this could weaken the stitching over time.
- Make sure you have enough stakes to secure the tent canopy, rainfly, vestibules and guy lines.
Where to Pitch Your Tent
Before setting up your tent, look for an even, level piece of terrain free of protruding tree roots and large rocks. Next, remove any smaller rocks, sticks, pinecones and other debris. Remember to bring a tarp or footprint, and place that down first. It’s usually best to avoid pitching directly under a tree, since a falling branch or dripping sap could damage your tent.
Tip: If you plan on sleeping in past sunrise, position your tent west of any trees. This will give you a little extra shade in the morning.
Tent Care
Over time, some damage is unavoidable. Holes and tears can be repaired in the field using adhesive repair tape or a tent repair kit. Most tents don’t come with a repair kit, so you may need to make your own. Here are a few other things to consider:
- Poles: When pitching your tent, it’s a good idea to setup all the poles first, and lay them out before you start. Double check that all pole sections are fully connected. If a connector isn’t properly seated, it could bend or break.
- Zippers: Make sure all doors and panels are completely zipped up before you pitch. Pitching with a partially open zipper could put stress on the zipper and break it. Try to keep the zippers out of the dirt, and try not to step on them. If your tent gets dirty, clean the zippers out with a squirt bottle at home. Dirt and debris can cause your zippers to wear out faster.
- UV Protection: Long exposure to sunlight can damage your tent, and UV light degrades most tent materials over time. If you leave your tent up during the day, try to place it in a shaded area. If shade is not available, it may be worth taking your tent down in the morning and setting it up again before nightfall.
Cleaning Your Tent
- If your tent is dirty, muddy or dusty, it’s important to clean it before putting it back into storage.
- Never wash your tent in the washing machine, and never machine dry it.
- To clean a specific area, use a sponge soaked in warm water.
- When cleaning the entire tent, wash it in a tub of cool water.
- Never use hot water, bleach, dishwashing soap or stain removers. Use only non-detergent cleaning agents.
- Dry your tent completely by pitching it in the shade or drying it on a line.
Storage
Never put your tent away if it’s wet or dirty. Once your tent is clean, take the following steps before storage:
- Setup your tent to dry inside your garage or in a dry, shaded location. Leave the tent doors open to allow airflow. Hang the fly separately using a clothesline or rope. Allow the tent and rainfly to air dry completely. Drying your tent will prevent mold, mildew and funky odors from forming.
- Don’t dry your tent outside in direct sunlight for extended periods.
- Fold your tent carefully, and store it in a cool, dry environment.