-
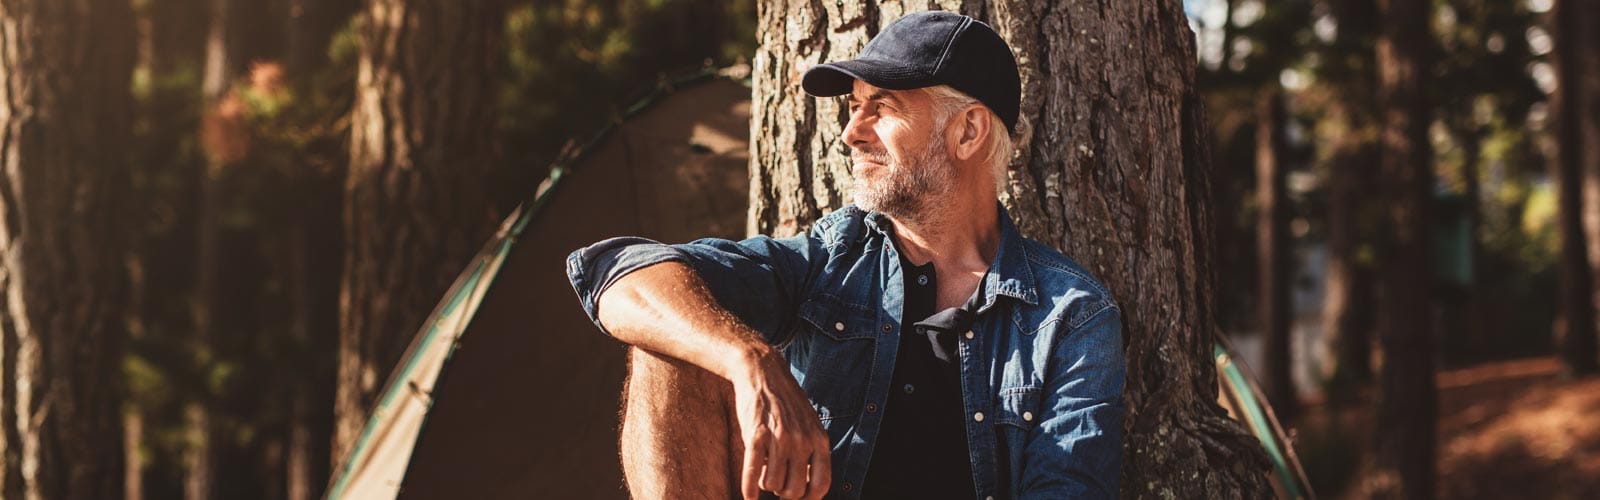
Buying a digital camera is an investment. However, a top-of-the-line camera is not essential for most beginners. We highly recommend doing some research online, reading reviews and articles, and possibly even visiting a local camera shop for advice. Before you choose a brand and model, it’s also a good idea to narrow your search. To get you started, we’ll break down four primary categories of digital cameras:
Point and Shoot Cameras
Lightweight, compact point-and-shoot cameras are the most affordable options and the easiest to use for casual photographers. These cameras have a fixed (non-interchangeable) lens, which may offer a small amount of zoom. Most are entirely auto-focusing and automatically adjust the exposure settings for each shot. Point-and-shoot models may not give the user much control to manually change settings, and most have a small image sensor. Picture quality will usually be slightly better than a smartphone.
Zoom Cameras
Available in both compact and full-sized models, these cameras have a large, non-interchangeable zoom lens that makes it easier to capture shots from varying distances. Functionally, a compact zoom camera works the same as a point-and-shoot, although some models offer a little more control over exposure settings. Most zoom cameras have a small- to medium-sized image sensor. Picture quality will depend on the camera, the size of the sensor and other factors. Zoom cameras are a step above point-and-shoot models.
DSLR Cameras
Upon first glance, DSLR cameras appear very similar to traditional 35mm cameras, including the ability to accept a variety of interchangeable lenses. DSLR cameras feature a medium to large digital image sensor and have more customizable settings than zoom cameras. Most professional photographers shoot using a DSLR. Prices can range anywhere from several hundred dollars into the thousands. The primary benefit to a DSLR camera is the optical viewfinder, which allows the photographer to see through the camera lens via a set of mirrors or a prism. What you see in the viewfinder is exactly what the lens will capture when you hit the shutter release.
Mirrorless Interchangeable-Lens Cameras
Unlike DSLR cameras, which have an optical viewfinder, mirrorless interchangeable-lens cameras (MILCs) don’t have internal mirrors or a prism. Instead, they have a digital viewfinder. This design allows a MILC to be lighter and more compact than a DSLR. Most have a medium to large image sensor, making picture quality better than most single-lens cameras. The ability to use multiple lenses and the compact size make an MILC ideal for outdoor photography. The primary drawback is the digital viewfinder, which may take some getting used to if you’re already accustomed to shooting with an optical viewfinder.
-
To take better photos, you’ll need to become familiar with your camera’s exposure settings. If you’re working with a very basic point-and-shoot model, you may not be able to manually change all of these settings. However, most zoom, DSLR and MILC cameras offer the option to manually control these settings, which can help you capture better-quality images in a greater variety of lighting conditions.
Aperture
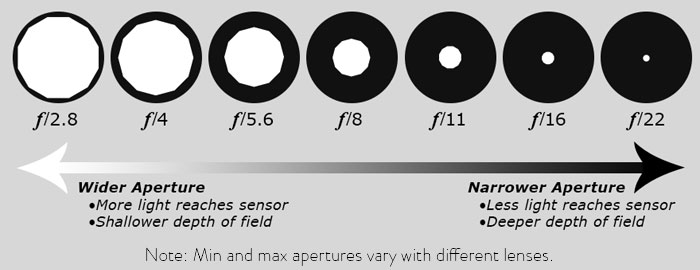
The adjustable opening that allows light to enter the lens is called the aperture. It works a lot like the pupil of a human eye, which constricts and dilates. A camera aperture has multiple settings, called stops. Wider aperture settings (represented by smaller numbers) allow more light to enter, making them ideal for low light situations. Narrower aperture settings (represented by larger numbers) allow less light to enter, which is ideal in brighter conditions. Aperture also affects depth of field (more on this later).
Basically, whenever you hit the shutter release button to snap a photo, the camera’s lens will allow light to pass through the aperture, which is either set manually or automatically. The aperture setting is one way to change the amount of light entering the lens during a shot, which affects the exposure.
Shutter Speed
This setting adjusts how long the shutter will remain open during a shot, allowing light to pass through the lens and onto the camera’s image sensor. Shutter speed is measured in seconds and fractions of seconds. If you’re shooting outside on a bright, cloudless day, you’ll probably be using a faster shutter speed (e.g. 1/500). If you’re shooting moving objects, such as an outdoor cycling event, you may need an even faster shutter speed to prevent the cyclists from looking too blurry, especially if you’re shooting close to the action.
- QUICK TIP: A little blur isn’t always a bad thing. For example, if you’re shooting a racing event, a small amount of blur can add a sense of speed and movement to your action photos.
On an overcast day or during the twilight hours, you’ll likely need a slower shutter speed, since there is less light available to help create the image. For night shots, you’ll need an even slower shutter speed, along with a higher ISO and wider aperture, in order for the image sensor to gather enough light. At slower shutter speeds, you’ll also need a tripod, because even small arm movements during the exposure can make the shot blurry.
ISO
In digital photography, the ISO setting determines the sensitivity of the camera’s image sensor. According to NikonUSA, lower ISO settings are used in brighter light conditions. Conversely, higher ISO settings are used in lower light conditions. Your camera’s ISO level may need to be adjusted depending on light conditions, aperture and shutter speed. For example, if you increase your shutter speed in order to snap shots during a mountain bike race, you may need to raise your ISO setting and/or widen the aperture, since there will be less time for light to enter the lens and hit the sensor. Using these settings optimally takes practice. Until you become more comfortable with aperture and shutter speed, consider leaving the ISO setting on automatic.
Priority Modes
If you want to get out of full auto mode for a little more control without going into full manual, priority modes are a great starting point for beginners.
- Aperture priority mode (usually marked Av on your selector) allows you to manually adjust aperture. Meanwhile, the camera will automatically adjust the shutter speed to compensate and achieve the correct exposure. This mode is ideal for experimenting with different depth of field effects (i.e. how much of the background is in focus).
- Shutter priority mode (usually marked S or Tv on your selector) gives you manual control over shutter speed. Meanwhile, the camera will automatically adjust the aperture to compensate and achieve the correct exposure. Shutter priority mode is ideal for shooting moving objects and changing the level of motion blur. If you’re shooting a bike race and want a little more blur to show movement, you can simply decrease the shutter speed by one or two stops.
-
Back in the days of film, many photographers would use a hand-held light meter to help determine the proper aperture and shutter speed settings (i.e. how much light is needed to achieve the correct exposure). With modern digital cameras, a light meter is built in. On basic point-and-shoot models, the camera automatically meters each shot and adjusts the settings accordingly. DSLRs and mirrorless interchangeable-lens cameras (MILCs) also give you the option to adjust your settings manually, using the meter only as a reference. The diagram below shows what a light meter might look like. The meter is usually situated at the bottom of the viewfinder and/or display screen.

How It Works
The brightness scale is a range between 0% brightness (black) and 100% brightness (white). A light meter analyzes the average brightness of the image (or a segment of that image), and compares it to your current exposure settings. The “goal” of the meter is to achieve an average brightness of 50%. If you’ve chosen to adjust your settings manually, the meter will compare your current settings to the image brightness and make a recommendation. If the light meter reads zero, your manual settings are on target to achieve 50% brightness. If it reads +1, the image is overexposed by one stop. If it reads -1 and 1/3 (thirds are represented by the dots), it’s underexposed by one and one-third stop.
When to Trust the Meter
The meter’s “ideal exposure” of 50% brightness isn’t necessarily best for every shot. It’s more of a guideline for shooting in “ideal” lighting conditions. For example, if you’re shooting a summertime landscape in the middle of the day without any overcast, you can probably trust the meter. However, if you’re shooting a snow-covered landscape, trusting the meter may lead to an underexposed image. This is because a snowy landscape is naturally brighter than average (more than 50% white). If you follow the meter and the shot looks too dark, either adjust your settings to compensate or choose a different meter mode.
Metering Modes
Most DSLR and MILC cameras offer multiple metering modes to help achieve better results. According to Digital Camera World, these modes determine how the camera’s meter will sample the image.
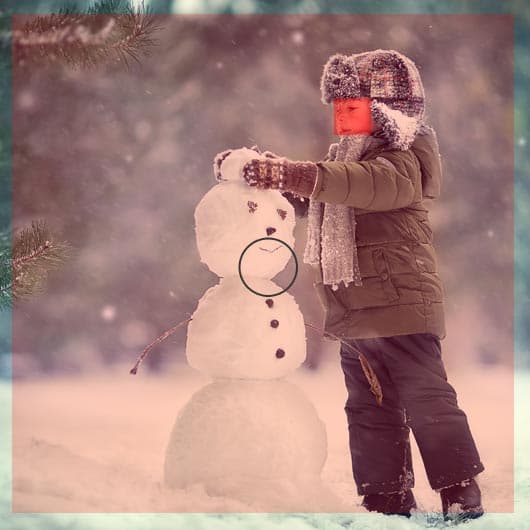
Evaluative Metering samples the entire image with an emphasis on the auto-focus point. This is the default mode for most DSLRs when shooting in full auto, and will be appropriate for shots in many light conditions. As you can see in the image above, the camera has chosen the child's face as the auto focus point, thus placing the light sampling emphasis on that area of the image.

Center-Weighted Metering also samples the entire image, but places increasingly more emphasis on the center of the image. This is ideal when you want the exposure to emphasize a subject in the middle of the frame. You might consider using this mode when shooting outdoor portraits.
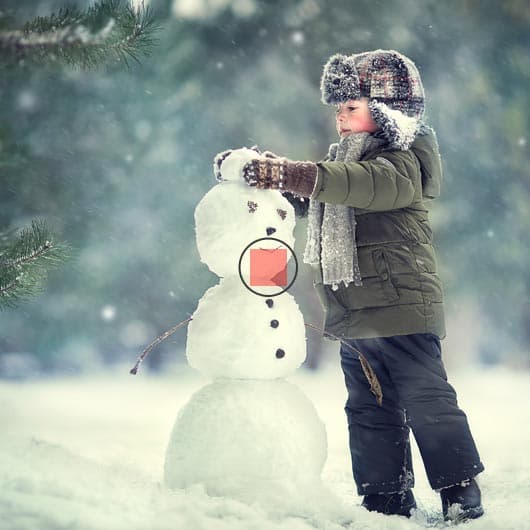
Spot Metering samples a small portion in the very center of the frame and ignores the rest. This is ideal when the subject of your image is much lighter or darker than the rest of the image, but doesn’t take up a large portion of the image. Bird photography is one example.
-
In order to capture the best possible photos in the great outdoors, there are many things to consider. There are hundreds of books, websites, articles and blog posts dedicated to the art of photography. To help you get the most out of this guide, we’ve narrowed things down to just a handful of fundamentals, along with a few helpful tips.
Light and White Balance
Since the sun is going to be your main source of lighting when you’re shooting outside, it’s important to consider how the conditions will affect your photos. Lighting and exposure are two things many new photographers struggle with, and getting them right takes practice. Keep in mind that shadows really help create contrast and visual interest, so it’s often best to avoid shooting in the middle of the day when the sun is directly overhead.
If you’ve ever heard of the “magic hour,” you already know that the period of time right before sunset and just after sunrise is considered the best time to take photos outdoors. This is because the light conditions create a rich contrast and color definition. Just keep in mind that shooting in lower light requires more finesse with your camera settings.
- QUICK TIP: Because you’ll need more exposure for low light situations, a tripod could make the difference between a slightly blurry shot and a perfectly crisp image. To avoid the extra weight, you can always use a trekking pole for stabilization.
According to Natalie Johnson of Digital Photography School, aside from tweaking your exposure settings, it’s also a good idea to adjust the white balance settings to get the best color quality. Fortunately with most digital cameras, you can preview your test shots right away and keep tweaking things until you’ve dialed in the settings that work best for the current light conditions.
- QUICK TIP: Since you’ll have limited time to shoot during that “magic hour,” you can maximize your chances of getting that perfect shot by scouting the location in advance. If you can’t, try to arrive at your shooting location at least an hour early, so you can find the perfect spot to shoot by the time the sun is headed for the horizon.
Depending on the conditions, your camera’s automatic white balance setting may not always recreate the most accurate colors. This is because certain light conditions can change the way your camera’s sensor perceives color. For example, on a heavily overcast day, a digital image may have too much blue, causing it to look cold. By switching to the “cloudy” white balance setting, the camera will compensate by adding warmth (yellow, red and orange) to the image. Other white balance settings include “daylight” for shooting in bright, sunny conditions and “shade” for shooting in shaded conditions.
Custom White Balance
Most DSLR and MILC cameras also give you the option to set a custom white balance. First, you’ll need a gray card, which can be purchased from a camera shop or an online store. Hold the card in front of the camera or lean it up against a rock and take a close-up shot of the card. (Depending on your camera, you may need to fill the majority of the frame with the gray card in order to get an accurate reading). After you have a photo of the card, open your settings and select custom white balance. Choose the image you just took as the basis for your custom balance. You’ll then need to make sure your camera is set to shoot using custom white balance, since it’s not the default setting.
Note: The process for setting custom white balance may vary slightly, depending on the make and model of your camera. It’s always a good idea to check the manual for instructions first.
Always remember that if the lighting conditions change (such as clouds rolling in), you’ll need to reset your custom white balance or switch over to a preset. It’s also a good idea to return your white balance to the default auto setting after you’re done shooting.
Lenses and Focal Length

In outdoor photography, the angle of view is largely determined by the focal length of your lens, and this can have a big impact on the composition of your photos. For example, if you plan to shoot a lot of landscapes, consider investing in a wide-angle lens, which will capture a broader angle of view than a standard lens. This can add a much more dramatic sense of space and depth to your compositions. If you really want to get creative with your landscape photos, you can also experiment with a super-wide-angle lens or a fisheye lens.
Planning to do some wildlife photography? Unless you’re able to get within spitting distance of that majestic elk or golden eagle, you may want a telephoto lens. Designed to provide a longer focal length than a standard lens, a telephoto lens will make it easier to get close-up shots of wildlife without actually standing a few feet away. The larger the lens, the farther away you can be before the subject becomes too small.
Do you enjoy close-ups of flowers, plants and insects? A stock lens will only allow you to get so close before you’re out of focus range. With a macro lens, you can get incredibly sharp, close-up shots that you simply can’t get with a standard lens. A macro lens is also great for shooting close-up portraits.
Want maximum versatility? Unlike “prime lenses,” which have a fixed focal length, a zoom lens actually allows you to adjust your focal length on the fly. With a zoom lens, you can shoot from afar and relatively close up. However, there is a slight trade off. Because of the way zoom lenses function, they don’t provide the same image quality as prime lenses at all exposure settings. Zoom lenses also tend to be bulkier and heavier than prime lenses.
Photo Composition
Lighting, camera settings and lenses aren’t everything. What you frame in the viewfinder is just as important. A scene that looks appealing to the naked eye won’t necessarily look great in a photo. The best amateur and professional photographers develop a knack for framing great compositions in clever ways. Sometimes this involves shooting from different vantage points.
The best way to capture something special is to experiment with different compositions. For example, holding the camera just above ground level can make some shots much more interesting. Below are some more tips and tricks worth trying:
- Take multiple shots from different angles and distances (or use a variety of focal lengths if you have a zoom lens). Having too much empty space can make shots less interesting.
- If your scene has a prominent focal point, don’t frame it in the exact center of the image. A little asymmetry can be more pleasing to the eye.
- Sometimes you can use components in your image to lead the viewer’s eye in the direction you want. Be aware of how angles and contours can lead toward or away from your focal point.
- If you’re shooting in a setting with lots of trees or tall vegetation, try not to clutter the picture with too many objects in the foreground. However, a small amount of foreground objects (branches, leaves, etc.) can add a sense of depth and visual interest if used correctly.
- Don’t forget to experiment with vertical shots (i.e. holding the camera at a 90-degree angle to the horizon). Some shots actually look better this way.
- For close-up shots, try using shallow depth of field (see next section for details).
Shallow Depth of Field

Snapping close-up shots with this effect is a great way to focus attention on a specific part of the photo and divert attention away from the background, which will be out of focus. This technique is especially handy for shooting outdoor portraits and close-up shots of plants and flowers. To shoot using a shallow depth of field, follow these steps:
- Use manual focus.
- Adjust your exposure settings manually, or use aperture priority mode.
- Open your lens aperture to one of the widest settings. The lower the number, the wider the aperture. For example, f1.4 is one of the largest aperture openings on most camera lenses and f22 is one of the smallest.
- If the subject is too far away, you won’t be able to achieve shallow depth of field, so make sure that you’re fairly close to the subject. For close-up shots of smaller objects like flowers, you’ll want to bring the subject even closer, but not so close that the object is no longer in focus range. For larger subjects like people, you’ll need to be a little farther back.
- If you’re using a zoom lens, zoom in on the object or person you want to be in focus. If you zoom out (widening the focal length), more of the image will start to come into focus.
- Finally, focus in on the subject of your photo. The background should be mostly out of focus, creating a clear focal point on your subject.
Outdoor Portraits
There’s something special about outdoor portraits, but getting them right can be tricky. For example, lighting is very important to consider before you start snapping. Here are some tips:
- Use manual focus, and choose a single focus point — usually the eyes.
- Generally, it’s best for the sun to be behind the photographer, although not necessarily directly behind. (This can make it hard for the subject to look toward the camera). If the sun is directly behind your subject, it will cause them to appear as a silhouette. If you’re close enough, you can try using fill flash to compensate for this. However, if there are trees in the background, you can achieve a nice effect with the sun barely peeking out behind a tree or branch. Shooting in a shaded area is also a great way to achieve beautiful outdoor portraits. Overcast weather can also be great.
- Get your exposure dialed in with center-weighted or spot metering, especially if you’re shooting in lower light.
- Take several shots for each pose, or use your camera’s rapid-fire mode. This way, if your subject blinks when you hit the shutter release, you won’t lose a shot.
- It’s usually best not to have your subject in the exact center of the frame, although this is not an iron-clad rule. Try framing the subject in multiple ways, and see what looks best.
- It can be tricky to get your subjects to look natural when they’re “posing for the camera.” Get them to loosen up by having them walk a little or look away from the camera. You can also stage “candid poses.”
- Although it might seem a little counterintuitive, photographer Roseann Ritter actually recommends trying the flash when shooting portraits outside. “Most modern cameras have ‘fill flash’ capabilities,” Roseann said. “If you use your flash outside on a sunny day, it’ll actually fill the shadow areas. Faces will also be brighter. Just remember that the flash range is limited, so you’ll need to be within 10 or 12 feet to get the full benefit.”
-

It’s pretty easy to go overboard on camera accessories. We’ll cover some of the primary gear every amateur photographer should keep in mind when shooting outdoors, and leave the rest for you to discover on your own.
Camera Strap
This is likely the most important accessory you’ll own. Although many cameras come with a basic strap, the comfort level may not be up to par, and nobody wants to walk around for hours with a chintzy, uncomfortable nylon sling. Investing in a high-quality camera strap will make a big difference, especially if you like to hike with your camera slung over your neck and shoulder.
Camera Bag
The next most important piece of gear in your arsenal is probably the camera bag. Available in a wide variety of sizes and styles, your bag should provide appropriate storage and protection for all of your equipment. Some photographers have multiple bags for different “rigs.” For example, you might have a larger bag for general purpose use and a more compact kit for street-shoots and travel. Alternatively, you may simply want cases for your lenses and a small padded case for your camera, all of which can be stored in a daypack.
Lens Hood
If you’re shooting with a camera lens that offers a compatible hood (some lenses actually come with them), there are two good reasons to consider using one. First, in certain light conditions, a lens hood can prevent lens flare from blemishing your images. Flare sometimes creates white or hazy dots in a photo, which are caused by reflected or stray light. With the right software, you can edit these out later, but a hood may simply prevent them. Secondly and possibly more important, if you ever drop your camera and it hits the ground lens-first (hard to imagine, but it happens), the hood could potentially save your lens. It might still break anyway, but even a small amount of extra protection is worth it.
Lens Filters
Bright outdoor conditions can potentially lead to glare, which may cause your images to lose saturation and look washed out. Glare is also more likely to occur if you’re shooting landscapes with water or snow in the frame. Fortunately, a polarizing filter can quickly remedy the situation. Just be aware that polarizing filters can decrease the amount of light entering the lens, which means you may need to adjust your exposure settings to compensate. If you’re shooting with an auto-focusing lens, choose a circular polarizing filter and not a linear filter. For more information on lens filters, check out Cambridge in Colour.
Lens Cleaner
Your lens doesn’t have to be utterly spotless, but a dirty lens can affect image quality. For wiping dust off your optics, never reach for that shirttail or sleeve. To avoid small abrasions that can potentially diminish picture quality over time, always wipe your gear with a lens cloth and cleaner designed specifically for optics.
Extra SD Card
Forget to move all those files from your camera’s SD card onto your computer after your last photo session? The last thing you want is to be out in the field and realize your SD card is full and you forgot to bring a spare. Having plenty of extra storage is especially important if you’re shooting in a larger file format, like RAW.
Tripod
Although you won’t need it for every occasion, all amateur photographers should own a tripod. Unless you plan to only shoot during the middle of the day, a tripod will give you the versatility to experiment with longer exposure times and different lighting. If you ever plan on shooting at night, a tripod is absolutely essential.